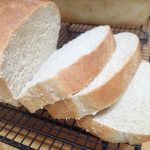
High Altitude Whole Wheat Bread
A time tested, fluffy 100% whole wheat sandwich bread.
Servings 2 loaves
Ingredients
Sponge
- 2 1/4 tsp dry active yeast or 4 tsp fast rising
- 3/ 4 C Warm water Water should be between 105-115° F
- 2 TBSP honey
Dough
- 2 C warm water or whey
- 5-7 C wheat flour white wheat flour will produce a slightly more fluffy loaf
- 1/2 C vital wheat gluten
- 1 TBSP salt
- 1/4 C olive oil
- 1/3 C honey
- butter optional
Instructions
Sponge
- Temperature is very important when it comes to sponge. If your water is too hot you will kill your yeast and your bread won't rise. If the water is too cold the yeast won't activate and your bread won't rise. I don't tell you that to scare you off, but to let you know that this is not the part of the recipe where you want to cut corners. I have been known to cut corners and I learned my lesson with bread the hard way. Now, I religiously use a thermometer and my bread consistently turns out.
- Heat your water to between 105-115° F. I heat mine in the microwave, but you can heat yours however you want. If the temperature is greater than 115° let it sit on the counter until it cools to the appropriate range. (Technically the yeast could survive to 119,° so take comfort in knowing you have a buffer.)
- Sprinkle the yeast across the surface of the water, then add the honey. Stir till mixed. Cover with a light towel and allow to sit until the mixture is bubbly, about 20-30 minutes. I use a 1 C liquid measuring cup, once the bubbles have reached the top I know it's ready.

Dough
- Pour the sponge into a bowl. I use the bowl from my stand mixer. Add the 2 cups warm water or whey (This water temperature isn't as crucial. Lukewarm is fine), 2 cups of the flour, vital wheat gluten, salt, oil, and honey. (Tip: measure the oil in a measuring cup, then use the same measuring cup to measure the honey.) Mix until well combined - you can do this with a spoon or the paddle attachment on a stand mixer.
- Gradually add the rest of the flour in 1/2-1 C portions until the dough forms a ball and no longer sticks to the sides of the bowl. (If you are using freshly ground flour, I find I use more flour because it is so fluffy.)
- Switch to a dough hook if using a stand mixer or turn the dough out onto a lightly floured surface. Knead the dough until the dough is smooth and elastic. (About 5-8 minutes with a stand mixer or 9-10 minutes by hand.)
- Put the dough into a lightly oiled bowl and cover with a light towel. (I pull the dough out and drizzle a bit of oil into the bottom of my bowl. I then put the dough back in, turning it over once to oil both sides.) Put in a warm location and allow to rise until nearly doubled in size or until when you poke the dough gently with your finger the dough doesn't spring back. (Rising will take anywhere from 1-2 hours depending on the temperature.)
- Deflate the dough by punching it down. Divide into two equal parts and gently shape into a loaf. Put the loaves seam side down into two greased bread pans. Cover with a towel and rise a second time.
- Preheat your oven to 375° F 30 minutes after the bread starts its second rise. (I like to set the loaves on top of the oven because the heat will help them rise.)
- Once the loaves have risen to 1.5 to 2 times their initial size, put them in the oven. Bake for 25 minutes. If you want a soft, buttered top, remove the loaves from the oven and slather with butter. (I just grab a stick of butter and rub it across the top.) Return to the oven and bake an additional 3-7 minutes until the top is golden. (If you don't trust your instincts, you can stick an instant read thermometer into the loaf. When the internal temp reaches 180-190° F it's done.)
- Let the bread cool in the pans on a rack for about 20 minutes then turn them out to cool more(or eat!).
Notes
Altered from Patchwork Radicals.